

Article summary: This tutorial explains how to record your customers' arrival (check-in) and departure (check-out) in Reservit Activities. You can do it from the right-hand panel of the schedule on the day of the activity, or from the booking record. At a glance, you see who has arrived, who has left and who is still expected.
The 4 key steps to check in your customers:
-
Check the setting: check-in must be enabled for your property (check-in / checkout setting).
-
Open the booking in the schedule: on the home page, click the booking to show it in the right-hand panel.
-
Record the arrival: click CHECKIN; the button turns into CHECK OUT.
-
Record the departure: click CHECK OUT when the customer leaves.
Why follow this guide? Checking in your customers at the front desk lets you spot no-shows right away, know who is still on site and keep reliable track of the day's activities.
Check-in must be enabled for your property: Managing my activity > Property Setup > PROPERTY INFORMATION > Slots and Resources section > check-in / checkout management set to Yes.
Record the arrival from the schedule
1. On the home page (schedule), click the booking of the day. The right-hand panel opens and shows the booking with its CHECKIN and INVOICING buttons.
2. When the customer arrives, click CHECKIN. A success message appears and the button turns into CHECK OUT: the customer is recorded as arrived.
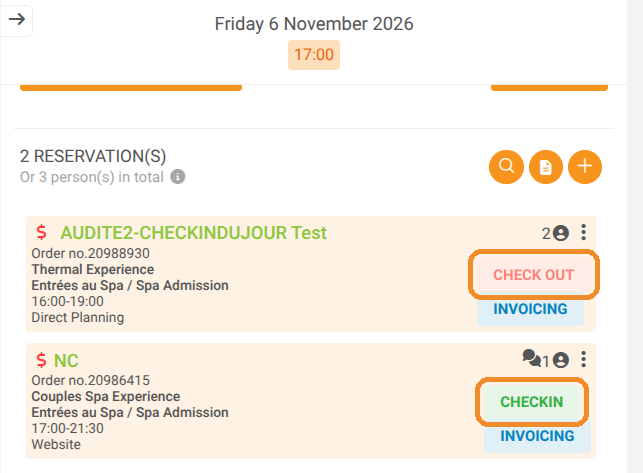
In the schedule panel, the CHECKIN button is only active on the day of the activity: for a booking on another day, it is shown pale.
Check-in applies to the whole booking: all participants are checked in at the same time.
Record the departure
3. When the customer leaves, click CHECK OUT. A success message appears and the CHECK OUT button turns pale: the customer is recorded as gone.
Check in from the booking record
You can also check in a customer from their booking record, for example after finding it with a search.
4. Click My reservations > Reservation management, search for the booking, then click Modify.

5. At the bottom left of the record, click Check in.

6. The button turns green and shows Customer arrived.

Clicking Customer arrived again records the customer's departure, without asking for confirmation. The record then shows Check in again, as for a customer who has not come yet: to know whether a customer has left, check the schedule panel instead (pale CHECK OUT button).
Check-in and check-out do not send any email to the customer and do not appear in the booking Historical.